


Founder & Web Hosting Specialist
Email Mendy | More About Mendy
With over 15 years in web hosting, digital marketing, and site management, Mendy Perlman has seen what happens when hosting decisions go wrong - and how to prevent it. He specializes in the full stack of website longevity: domain systems, DNS configuration, hosting environments, server performance, and SEO-friendly architecture.
His work isn't theoretical. It's built from years of managing real sites, under real traffic, for real clients across a wide range of industries. This site exists to share what he's learned clearly, honestly, and without the marketing spin.
Areas of Expertise
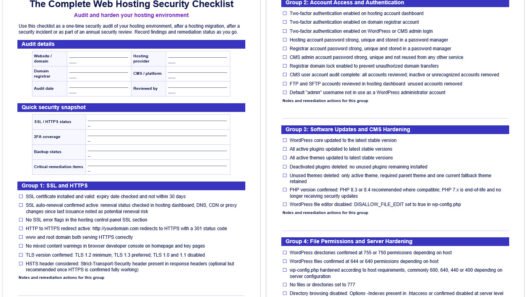
- Web Hosting & Server Management
- DNS Configuration & Domain Systems
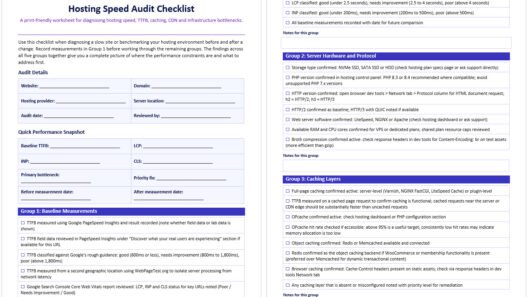
- Website Performance Optimization
- SEO-Friendly Site Architecture
- Digital Marketing & Web Design
- CMS Platforms (WordPress, Shopify, Webflow, Wix, Squarespace, etc.)
Tools & Platforms
- cPanel / WHM - industry-standard hosting control panel
- Apache / Nginx / LiteSpeed - core web server platforms
- Cloudflare / BunnyCDN / KeyCDN - CDN, DNS, and security management
- Cloudflare WAF - web application firewall & threat protection
- GoDaddy / Namecheap - domain registration and management
- MXToolbox - email and DNS diagnostics
- WordPress - CMS powering 40%+ of the web
- Webflow / Squarespace / Wix - website builders and CMS platforms
- WP Rocket / W3 Total Cache - caching and performance optimization
- Google Analytics / GA4 - site traffic and performance tracking
- Google Search Console - SEO health and indexing monitoring
- GTmetrix / Google PageSpeed Insights - site speed diagnostics
- Ahrefs / SEMrush - SEO analysis and keyword research
- Screaming Frog - technical SEO crawling and auditing
- SSL/TLS (Let's Encrypt / Comodo) - secure certificate management
- Sucuri / Wordfence - website security and firewall protection
- UptimeRobot - uptime monitoring and alerts

