


Article Contents
- 1 Website Migration Checklist - Switching Hosting Providers Without Changing Your URLs
- 1.1 Download the Free Website Migration Checklist
- 1.2 Key Takeaways
- 1.3 What This Checklist Covers (and What It Does Not)
- 1.4 Before You Touch Anything - Pre-Migration Preparation
- 1.5 Setting Up the New Hosting Environment
- 1.6 Email - The Most Commonly Broken Thing in a Migration
- 1.7 The DNS Cutover
- 1.8 Immediately After Cutover - What to Check in the First Hour
- 1.9 Post-Migration Monitoring - The 48 Hours After Cutover
- 1.10 Common Migration Mistakes and How to Avoid Them
- 1.11 The Complete Website Migration Checklist
- 1.12 Need Help With Your Hosting Migration?
- 1.13 References & Additional Resources
- 1.14 Tagged In:
Website Migration Checklist - Switching Hosting Providers Without Changing Your URLs
Moving to a new host is one of the most common things site owners do and one of the most commonly rushed. This checklist covers every step from the first backup to the moment you cancel old hosting.
Important Note: Every hosting environment, hosting provider and website is different. The steps, settings and requirements for your migration will vary depending on your current host, your new host and how your site is configured. Before starting any migration, review the documentation and support resources provided by both hosting providers. This checklist covers the most common steps in a standard hosting migration and is provided for informational purposes only. It may not reflect every requirement, edge case or provider-specific process relevant to your situation. When in doubt, contact your hosting provider directly before making changes.
Download the Free Website Migration Checklist
The five-phase checklist above is available as a free download in PDF and editable Word format. Keep it open in a second tab while you work through your migration, print it and tick boxes by hand, or share it with whoever is handling the technical side of the move.
Both versions include every checklist item from pre-migration preparation through to the final post-migration sign-off, organised in the same phase order as this guide. The Word version is fully editable so you can add notes, adjust steps for your specific setup or use it as a template for future migrations.
Key Takeaways
- A hosting migration with no URL changes is the lowest-risk type of site move, but it still requires a clear sequence to avoid downtime or data loss
- The new hosting environment must be fully built and tested before you touch DNS; flipping DNS before the new server is ready turns a simple migration into a live emergency
- Lower your DNS TTL to 300 seconds at least 24 to 48 hours before the cutover so propagation resolves as fast as possible; Google recommends a week in advance where you have the time to plan ahead
- Email records (MX, SPF, DKIM, DMARC) are the most commonly broken thing in a rushed migration; document them before you change anything
- DNS propagation means some visitors will still hit the old server for up to 48 hours after cutover; keep old hosting active during that window
- Google’s own documentation on hosting changes recommends monitoring traffic on both old and new infrastructure before shutting down the old server
- Never cancel old hosting until you have confirmed that all traffic is routing to the new server
A hosting migration sounds straightforward until you are mid-process and something breaks. Email stops working. The site throws a database error. DNS propagates faster than expected and visitors hit a half-configured server. None of these problems are complicated to prevent. They are all the result of the same thing: skipping steps or doing them in the wrong order.
This guide covers the specific type of migration that most site owners actually do: moving from one hosting provider to another while keeping the same domain, the same URLs and the same CMS. No redirects needed. No URL mapping. No Google Search Console change-of-address notification. Just a clean infrastructure move that, done correctly, is essentially invisible to visitors and search engines alike.
If you want the foundational context on how DNS and hosting work together before going through this checklist, what DNS is and how it works, what nameservers are and how to change them and how to connect domain and hosting are useful starting points. If you are also evaluating whether to upgrade your hosting at the same time as migrating, how to choose the right web hosting provider and how to select the best hosting plan for your needs cover that decision in depth.

What This Checklist Covers (and What It Does Not)
Website migration is an umbrella term that covers several fundamentally different types of changes. Moving to a new CMS, restructuring your URL architecture, switching to a new domain name and moving to a new hosting provider are all called migrations, but they require completely different approaches and carry very different levels of SEO risk.
This checklist covers one specific scenario: you are switching hosting providers. Your domain name stays the same. Your URLs stay the same. Your CMS stays the same. You are moving the infrastructure, not the content or the site structure. Google’s Search Central documentation on hosting changes is built around exactly this scenario and describes it as the lowest-risk category of site move because no URL changes means no redirects, no index updates and no change-of-address notifications required.
This checklist does not cover domain name changes, URL restructuring, HTTP to HTTPS migrations, CMS platform changes or full site redesigns. Those scenarios have different requirements and are outside its scope.
The risk in a hosting migration does not come from the move itself. It comes from rushing the DNS change before the new environment is ready, from failing to preserve email records, from cancelling old hosting before propagation is complete and from having no tested rollback plan. Every section of this checklist is designed to address one of those failure points directly.
I have seen the same sequence failure play out repeatedly: someone transfers files, immediately changes DNS and then discovers the new host has a database configuration error or the email records were not carried over. Forgetting the email records has tripped me up more than once. The checklist below exists specifically to prevent these issues. Just keep in mind, each setup is unique so, while this checklist covers the most common migration steps, it’s important to also review the documentation from your hosting providers.

Before You Touch Anything - Pre-Migration Preparation
Everything in this section should be done before you set up a single file on the new host. These are the steps that give you a safety net, a record of what currently exists and a faster propagation window when you are ready to cut over.
Full site backup. Export a complete backup: all site files and the full database. Store it somewhere off-server, separate from both the old and new hosting accounts. A backup on the same server you are migrating away from is not a safety net; it disappears if the old account is closed or something goes wrong. Most cPanel-based hosts make this straightforward via the Backup or Backup Wizard tool. WordPress sites can use a plugin like UpdraftPlus or Duplicator. Whatever method you use, verify the backup actually downloaded and contains both the files and the database before moving on.
DNS zone export. Open your current DNS provider and document every single record before changing anything. This means A records, AAAA records, CNAME records, MX records and every TXT record including SPF, DKIM and DMARC values, plus any SRV records or verification tokens you may have added for third-party services. This export is your single source of truth if a nameserver change results in missing records. Copy the values into a spreadsheet or text file and save it.
Email records documented separately. Because email is the most commonly broken service in a hosting migration, it deserves its own documentation step. Write down the exact MX hostname and its priority value, the full SPF TXT record, the DKIM selector name and TXT value and the DMARC policy record. You will need these exact values when setting up the DNS zone on the new provider.
TTL reduction. TTL (time to live) is the cache timer that tells DNS resolvers how long to hold onto an answer before checking again. Most DNS records default to 3,600 seconds (one hour) or 86,400 seconds (one day). Lowering your A record TTL to 300 seconds means that after you make the DNS change, most resolvers will pick it up within five minutes rather than waiting for a multi-hour cache to expire. Do this 24 to 48 hours before your planned cutover so the reduced TTL has had time to propagate through the DNS system. Note that Google’s own documentation recommends reducing TTL at least a week in advance where possible; 24 to 48 hours is the reliable practical minimum, and the earlier you do it the cleaner the cutover.
Performance baseline. Run your site through Google PageSpeed Insights and note the server response time (TTFB). This gives you a benchmark to compare against after the migration. If TTFB is significantly worse on the new host, you will want to know that immediately rather than discovering it weeks later. For more on what TTFB means and why it matters, how web hosting impacts website speed covers this in detail.
Choose your migration window. Pick a low-traffic period for the DNS cutover. For most sites that means a weekday overnight or early morning window. Check your analytics to confirm when your lowest traffic period actually is rather than assuming.

Setting Up the New Hosting Environment
The most important rule in a hosting migration is that the new environment should be fully working and tested before you change DNS. DNS changes are not easily reversible in the short term because of caching. If you flip DNS and then discover a database configuration error or a broken contact form, you are debugging a live problem under time pressure.
Transfer site files. Copy all site files from the old host to the new host. This can be done via FTP, SFTP, cPanel’s file manager or a migration plugin if you are on WordPress. Make sure you transfer everything including hidden files like .htaccess.
Transfer and configure the database. Export the database from the old host using phpMyAdmin or a similar tool, then import it to the new host. After importing, update the database configuration file to point to the new database. On WordPress this means editing wp-config.php with the new database name, username, password and host. On other platforms the equivalent configuration file will vary.
Match PHP version. Check what PHP version your old host is running and confirm the new host supports the same version. A PHP version mismatch can cause plugin or theme errors that do not appear until the site is live on the new server.
Install SSL on the new host. Most hosting providers make this straightforward through Let’s Encrypt integration or a built-in SSL tool in the control panel. The certificate needs to be issued and active before visitors start hitting the new server. Let’s Encrypt documentation explains how their free automated certificates work if your host uses it.
Confirm Search Console verification is preserved. If you use the HTML file method to verify ownership in Google Search Console, make sure that file is present in the new copy of your site. If you use a meta tag or Google Analytics tag for verification, confirm it is included in the new environment’s templates. Missing verification on the new host can cause GSC access issues if a re-verification is triggered after the migration.
Check robots.txt is not blocking crawlers. Some site owners add a robots.txt disallow rule to the new host during the build phase to prevent Googlebot from indexing an unfinished environment. If you did this, confirm it is removed before you change DNS. A robots.txt that blocks crawling on the live environment will suppress indexing after the migration.
Test the site before changing DNS. This is the most important step before cutover. You can test the site on the new host without affecting live visitors by using a hosts file override on your local computer (which points your local browser to the new server IP while everyone else still hits the old server) or by using a temporary hostname or preview URL if your host provides one. Walk through the full site: load the homepage, click through key interior pages, check that images and media display correctly, submit a contact form, test the checkout flow if applicable and verify HTTPS is working with no mixed content warnings. Fix any issues you find here, not after DNS has been switched.
Do not change DNS until this testing is complete and everything is working.

Email - The Most Commonly Broken Thing in a Migration
Email failures in hosting migrations are almost always caused by the same thing: a nameserver change is made without first recreating the full DNS zone at the new provider, and the MX records that control email routing end up missing or incorrect.
MX records tell the internet which mail server to deliver incoming email to. When someone sends a message to you@yourdomain.com, the sending server performs a DNS lookup for your MX records to find out where to route the message. If those records disappear after a nameserver change, email stops arriving. If they point to the wrong server, email bounces or routes incorrectly. This can happen within minutes of a nameserver change propagating.
Beyond MX records, three TXT records control email authentication and deliverability. The SPF record specifies which servers are authorised to send email on behalf of your domain. The DKIM record provides a cryptographic signature that receiving mail servers use to verify messages are genuine. The DMARC record tells receiving servers what to do with messages that fail SPF or DKIM checks. If any of these records are missing after a migration, outgoing email may land in spam folders or be rejected entirely.
Prevention is simple. Document all four record types (MX, SPF, DKIM and DMARC) before you change anything. If you are changing nameservers, recreate these records exactly in the new DNS zone before you update the nameservers at your registrar. Confirm they are present and correct in the new zone, then change the nameservers. Test email by sending and receiving a message within the first 30 minutes of the cutover.
If you are updating individual DNS records (A records only) rather than changing nameservers, your email records are typically unaffected because they stay in the same DNS zone you are already managing. You are only updating the records that point web traffic to the new host.

The DNS Cutover
There are two primary methods for pointing your domain to the new host. The right choice depends on your setup and how much DNS management you want to move. Both methods are covered in more depth in how to point a domain to a web host.
Method 1: Change nameservers. This moves DNS management to the new hosting provider or a DNS provider like Cloudflare. You update the nameserver values at your domain registrar to the nameservers provided by the new host. Before doing this, the full DNS zone must be recreated at the new provider including all MX, SPF, DKIM, DMARC, CNAME and any other records. If the zone is not complete before you switch nameservers, any missing records will result in broken services until you add them. This method is simpler for beginners who want everything managed in one place.
Method 2: Update individual DNS records. This keeps your DNS management where it is (at your registrar or existing DNS provider) and only updates the specific records that point web traffic. Typically this means updating the A record for the root domain to the new host’s IP address and updating the A record or CNAME for www. Email records are left untouched. This method is cleaner for migrations where you have complex DNS setups or want to minimise what changes. What nameservers are and how they work explains the difference between these two approaches if you want more detail.
Executing the cutover. Before making any change, confirm your TTL is already at 300 seconds (this should have been done 24 to 48 hours earlier). Make the DNS change. Note the exact time. Do not make any other changes at the same moment; if something goes wrong you want to know exactly what caused it.
What propagation means. DNS changes do not update everywhere instantly. Resolvers around the world have cached your old DNS values and will hold them until the TTL expires. With a 300-second TTL that has had time to fully propagate in advance, most resolvers will pick up the new values within five to ten minutes. Some will take longer due to their own caching policies or because they cached your record just before the TTL reduction took effect. This is normal. It is not an error. It is why both the advance TTL reduction and keeping the old host live during the propagation window both matter.
Keep old hosting active for at least 48 hours after the cutover. Monitor which server is receiving traffic using server logs, analytics or a DNS propagation checker tool.

Immediately After Cutover - What to Check in the First Hour
Once DNS has been updated, the immediate priority is confirming the new environment is working correctly for visitors who are already resolving to it. Work through these checks methodically rather than assuming the pre-migration testing covered everything.
Site loading. Test the site from multiple devices and ideally from a network different from the one you used for pre-migration testing. A mobile phone on cellular data is a reliable way to test from a fresh resolver that is likely to have picked up the new DNS values early. Confirm the homepage loads, key interior pages load and media displays correctly.
SSL and HTTPS. Confirm HTTPS is active, the padlock is showing and there are no mixed content warnings. Open your browser’s developer tools and check the console for any HTTP assets loading on an HTTPS page. Mixed content warnings usually mean images or scripts are being loaded via absolute HTTP URLs that need to be updated.
Email. Send a test email from your domain email address to an external address and confirm it is received. Send a reply back and confirm it is received at the domain address. Do this within the first 30 minutes of the cutover. Email issues that go undetected for hours can mean missed leads, missed replies and customer-facing problems that are hard to explain after the fact.
Forms and transactions. Submit your contact form and confirm the submission is received. If you have a checkout or payment flow, run a test transaction. Database-connected functionality like this is where configuration errors often surface.
DNS propagation check. Use a DNS propagation checking tool to see how the change is spreading across resolvers in different regions. You should start seeing the new server IP appearing in most locations within 15 to 30 minutes of a 300-second TTL change that has had time to propagate.
Analytics and tracking. Confirm your analytics tracking code is firing on the new environment. If you use Google Analytics or any conversion tracking, verify that sessions are being recorded correctly.

Post-Migration Monitoring - The 48 Hours After Cutover
The migration is not finished when DNS is updated. It is finished when you have confirmed that all traffic is on the new server, the new server is performing correctly and the old server is no longer receiving meaningful traffic. Until all three of those things are true, both hosting accounts need to stay active.
Confirm propagation is complete. Monitor DNS propagation over the following 24 to 48 hours. When the old server stops receiving meaningful traffic (visible in its access logs or analytics), propagation is complete for practical purposes. Some resolvers may take longer due to their own caching policies, but the vast majority should have updated well within 48 hours with a 300-second TTL.
Benchmark performance. Measure TTFB on the new host and compare it against the pre-migration baseline you recorded earlier. A significant increase in server response time is worth investigating before assuming the migration is complete. If the new host is slower than expected, this is the time to diagnose whether it is a caching configuration issue, a resource allocation issue or something else. For context on what good TTFB looks like and what affects it, Google’s documentation on TTFB sets the recommended threshold at under 800 milliseconds at the 75th percentile.
Google Search Console monitoring. Check GSC over the following week. You are looking for a stable indexed page count with no significant drop, no spike in crawl errors and no new coverage issues. For a hosting change with no URL changes, Google’s guidance notes that Googlebot’s crawl rate will typically drop temporarily immediately after the infrastructure change, then increase steadily over the next few days, potentially to rates higher than before the move. This is normal behavior. Persistent crawl errors are not.
Raise TTL back to normal. Once propagation is confirmed complete and everything is stable, raise your TTL back to a normal value (3,600 seconds is common). A very low TTL creates unnecessary query load on DNS servers and is only needed during the migration window.
Cancel old hosting. Only cancel the old hosting account after you have confirmed that: propagation is complete, all traffic is on the new server, email is working correctly, GSC shows no new issues and TTFB is acceptable. Cancelling early removes your fallback option. There is no meaningful cost to keeping old hosting active for a few extra days compared to the disruption of needing to roll back without an active environment to roll back to.

Common Migration Mistakes and How to Avoid Them
Most hosting migration problems are preventable. They tend to cluster around a small number of recurring mistakes.
Changing DNS before the new site is ready. This is the most consequential mistake. If the new host has a database error, a missing configuration file or an SSL issue and DNS is already pointing to it, visitors hit a broken site and you are debugging under pressure. Prevention: test the new environment completely via a hosts file override or preview URL before touching DNS.
Not lowering TTL in advance. Changing DNS without reducing TTL first means propagation takes hours rather than minutes. If something goes wrong and you need to roll back, a high TTL means the rollback takes just as long. Prevention: reduce TTL to 300 seconds at least 24 to 48 hours before the planned cutover; Google recommends a week in advance for maximum safety.
Skipping the DNS zone export. Changing nameservers without a complete record of your existing DNS zone almost always results in something being missed. Email records, third-party verification TXT records, subdomain CNAMEs for marketing tools and CDN configurations are all easy to forget. Prevention: export and document the full DNS zone before making any changes.
Breaking email records. Missing or incorrect MX records after a nameserver change are the single most common cause of email outages during migrations. Prevention: document MX, SPF, DKIM and DMARC records separately before the migration and confirm they are present and correct in the new DNS zone before switching nameservers.
Cancelling old hosting immediately after DNS change. DNS propagation takes time. Cancelling the old host within hours of the cutover removes the live fallback environment before everyone has switched to the new server. Prevention: keep old hosting active for at least 48 hours after the cutover and only cancel once propagation is confirmed complete.
Not having a rollback plan. If the migration goes wrong, what are the steps to revert? Where is the backup? Can you access the old host if needed? What DNS change needs to be reversed? Prevention: write down the rollback procedure before starting. It takes five minutes and you will be glad you have it if something goes wrong at 11pm.
Not benchmarking performance before migrating. Without a pre-migration TTFB measurement, you have no baseline to compare against after the move. If the new host is slower, you may not notice for weeks. Prevention: run PageSpeed Insights on your homepage before the migration and record the server response time.
Leaving a crawler block on the new host. If you added a robots.txt disallow rule to prevent Googlebot from indexing the new environment during the build phase, it is easy to forget to remove it before going live. Prevention: confirm the new host’s robots.txt is not blocking crawlers before you switch DNS.

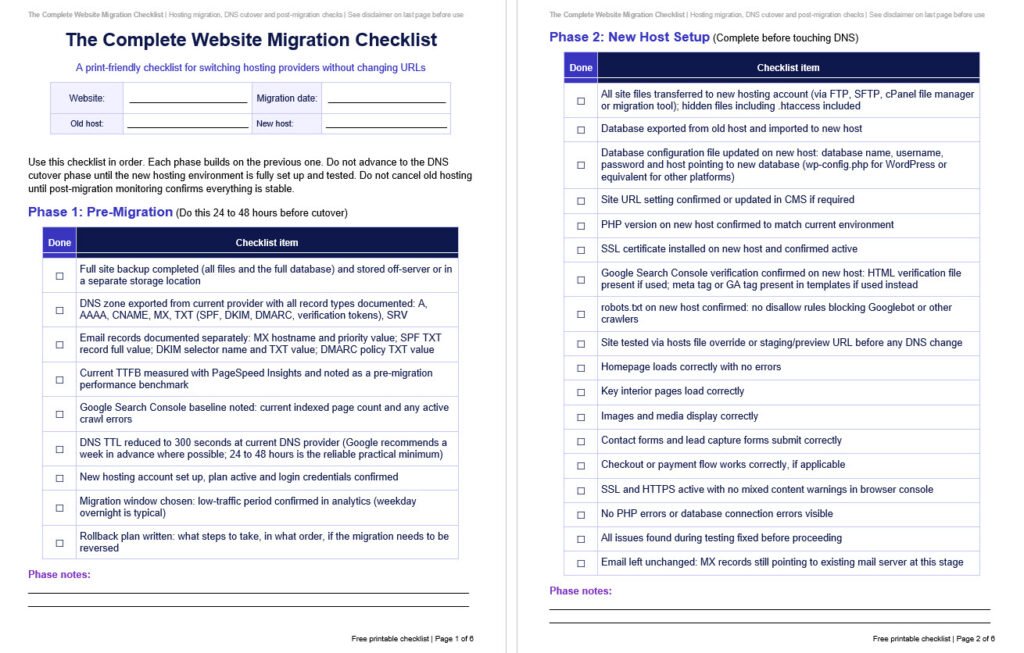
The Complete Website Migration Checklist
Use this checklist in order. Each phase builds on the previous one. Do not advance to the DNS cutover phase until the new hosting environment is fully set up and tested. Do not cancel old hosting until post-migration monitoring confirms everything is stable.
This checklist is available as a free downloadable PDF and editable Word document above at Web Hosting Services.
Phase 1: Pre-Migration (Do This 24 to 48 Hours Before Cutover)
- ☐ Full site backup completed (all files and the full database) and stored off-server or in a separate storage location
- ☐ DNS zone exported from current provider with all record types documented: A, AAAA, CNAME, MX, TXT (SPF, DKIM, DMARC, verification tokens), SRV
- ☐ Email records documented separately: MX hostname and priority value; SPF TXT record full value; DKIM selector name and TXT value; DMARC policy TXT value
- ☐ Current TTFB measured with PageSpeed Insights and noted as a pre-migration performance benchmark
- ☐ Google Search Console baseline noted: current indexed page count and any active crawl errors
- ☐ DNS TTL reduced to 300 seconds at current DNS provider (Google recommends a week in advance where possible; 24 to 48 hours is the reliable practical minimum)
- ☐ New hosting account set up, plan active and login credentials confirmed
- ☐ Migration window chosen: low-traffic period confirmed in analytics (weekday overnight is typical)
- ☐ Rollback plan written: what steps to take, in what order, if the migration needs to be reversed
Phase 2: New Host Setup (Complete Before Touching DNS)
- ☐ All site files transferred to new hosting account (via FTP, SFTP, cPanel file manager or migration tool); hidden files including .htaccess included
- ☐ Database exported from old host and imported to new host
- ☐ Database configuration file updated on new host: database name, username, password and host pointing to new database (wp-config.php for WordPress or equivalent for other platforms)
- ☐ Site URL setting confirmed or updated in CMS if required
- ☐ PHP version on new host confirmed to match current environment
- ☐ SSL certificate installed on new host and confirmed active
- ☐ Google Search Console verification confirmed on new host: HTML verification file present if used; meta tag or GA tag present in templates if used instead
- ☐ robots.txt on new host confirmed: no disallow rules blocking Googlebot or other crawlers
- ☐ Site tested via hosts file override or staging/preview URL (before any DNS change):
- ☐ Homepage loads correctly with no errors
- ☐ Key interior pages load correctly
- ☐ Images and media display correctly
- ☐ Contact forms and lead capture forms submit correctly
- ☐ Checkout or payment flow works correctly (if applicable)
- ☐ SSL and HTTPS active with no mixed content warnings in browser console
- ☐ No PHP errors or database connection errors visible
- ☐ All issues found during testing fixed before proceeding
- ☐ Email left unchanged: MX records still pointing to existing mail server at this stage
Phase 3: DNS Cutover
- ☐ TTL confirmed at 300 seconds (should have been reduced 24 to 48 hours earlier)
- ☐ DNS method confirmed: nameservers change OR individual A record update
- ☐ IF CHANGING NAMESERVERS: New DNS zone created at new provider with all records recreated (A, CNAME, MX, SPF, DKIM, DMARC, all TXT records, SRV)
- ☐ IF CHANGING NAMESERVERS: MX, SPF, DKIM and DMARC records confirmed present and correct in new DNS zone before nameservers are changed at registrar
- ☐ IF CHANGING NAMESERVERS: New nameservers entered at domain registrar and saved
- ☐ IF UPDATING A RECORDS: Root domain A record updated to new hosting server IP address
- ☐ IF UPDATING A RECORDS: www A record or CNAME updated to new hosting server
- ☐ Email MX records confirmed unchanged and still pointing to existing mail server
- ☐ SPF, DKIM and DMARC records confirmed preserved and unchanged
- ☐ Date and exact time of DNS change recorded
- ☐ Old hosting account confirmed still active and running
Phase 4: Immediately After Cutover (First Hour)
- ☐ Site loading correctly on new host confirmed from multiple devices
- ☐ Site loading confirmed from a network separate from the one used for pre-migration testing (mobile data recommended)
- ☐ HTTPS working: padlock visible, certificate valid, no browser SSL warnings
- ☐ No mixed content warnings in browser developer console
- ☐ Test email sent from domain email address to external address and received successfully
- ☐ Test reply sent back to domain address and received successfully
- ☐ Contact form submitted and submission received correctly
- ☐ Checkout or payment flow tested if applicable
- ☐ DNS propagation checked from multiple geographic locations using a propagation checker tool
- ☐ Analytics tracking confirmed active and recording sessions on new environment
- ☐ Uptime monitoring confirmed active on new host
Phase 5: Post-Migration (48 Hours and Beyond)
- ☐ DNS propagation confirmed complete: old server receiving no meaningful traffic in logs or analytics
- ☐ TTFB on new host measured and compared against pre-migration baseline
- ☐ Core Web Vitals reviewed in Google Search Console for any regressions
- ☐ Google Search Console checked: indexed page count stable, no spike in crawl errors, no new coverage issues
- ☐ Googlebot crawl rate monitored over following days: a temporary drop immediately after cutover followed by a steady increase over the next few days is normal per Google’s documentation; persistent crawl errors are not
- ☐ All site functionality verified across 48-hour period: forms, media, search, login, transactions
- ☐ Analytics data reviewed: traffic patterns normal, no unexpected drop in sessions
- ☐ TTL raised back to normal value (3,600 seconds or provider default)
- ☐ DNS zone backup saved from new provider for records
- ☐ Old hosting account cancelled only after all of the above confirmed
- ☐ Migration documented: new host name, DNS provider, server IP, date completed, any issues encountered and resolved
Need Help With Your Hosting Migration?
If you are working through a migration and want a second set of eyes on your DNS zone, your cutover plan or your new hosting configuration, the checklist above covers everything you need. But if you would rather have someone handle the DNS transfer, file migration, SSL setup and post-migration verification for you, that is exactly what the migration service at Web Hosting Services is built for.
The goal is simple: a clean move with no downtime, no broken email and a new host that performs better than the one you are leaving. If that is what you need, contact us and describe your current setup. Include your registrar, your current host and your new host if you have already chosen one, and we will map out the safest path forward for your specific configuration.
References & Additional Resources
- Google Search Central. “Changing Your Web Hosting and SEO (Site Move Without URL Changes).”
- Google. “Time to First Byte (TTFB).” web.dev.
- Google. “Understanding Core Web Vitals and Google Search Results.” Google Search Central.
- Let’s Encrypt. “Documentation.”
- Cloudflare. “DNS Concepts.” Cloudflare Developer Documentation.
- Google. “PageSpeed Insights.”
Tagged In:
- Beginner Hosting, DNS Configuration, DNS Propagation, DNS Records, DNS Settings, Domain Connection, Domain Pointing, Hosting Migration, Hosting Performance, Hosting Reliability, Hosting Security, Hosting Servers, Hosting Setup, Name Servers, Site Speed, SSL Certificates, Web Hosting, Website Hosting, Website Launch, Website Migration