








Article Contents
- 1. First Website Launch Checklist - Everything You Need Before Going Live
- 1.1. Download the Free First Website Launch Checklist
- 1.2. Key Takeaways
- 1.3. Step 1 - Domain Registration
- 1.4. Step 2 - Hosting Account Setup
- 1.5. Step 3 - Connecting Your Domain to Hosting
- 1.6. Step 4 - SSL Certificate and HTTPS
- 1.7. Step 5 - CMS Installation and Site Setup
- 1.8. Step 6 - Contact Form and Core Functionality Testing
- 1.9. Step 7 - Analytics, Search Console, Backups and Monitoring
- 1.10. The Complete First Website Launch Checklist
- 1.10.1. Step 1 | Domain Registration
- 1.10.2. Step 2 | Hosting Account Setup
- 1.10.3. Step 3 | Connecting Domain to Hosting
- 1.10.4. Step 4 | SSL Certificate and HTTPS
- 1.10.5. Step 5 | CMS Installation and Site Setup
- 1.10.6. Step 6 | Contact Form and Functionality Testing
- 1.10.7. Step 7 | Analytics, Search Console, Backups and Monitoring
- 1.11. Ready to Launch or Need Help Getting Set Up?
- 1.12. References & Additional Resources
- 1.13. Tagged In:
First Website Launch Checklist - Everything You Need Before Going Live
Many first websites go live with something broken or missing. This checklist covers every step from registering your domain to confirming your site is indexed, backed up and monitored.
Important Note: Hosting control panels, CMS platforms, domain registrars and DNS providers vary in their interfaces and setup steps. This checklist covers the most common setup path for a first WordPress website on shared hosting. Some steps may look different depending on your specific host, platform or registrar. Always consult your hosting provider’s documentation if you are unsure about a specific step.
Download the Free First Website Launch Checklist
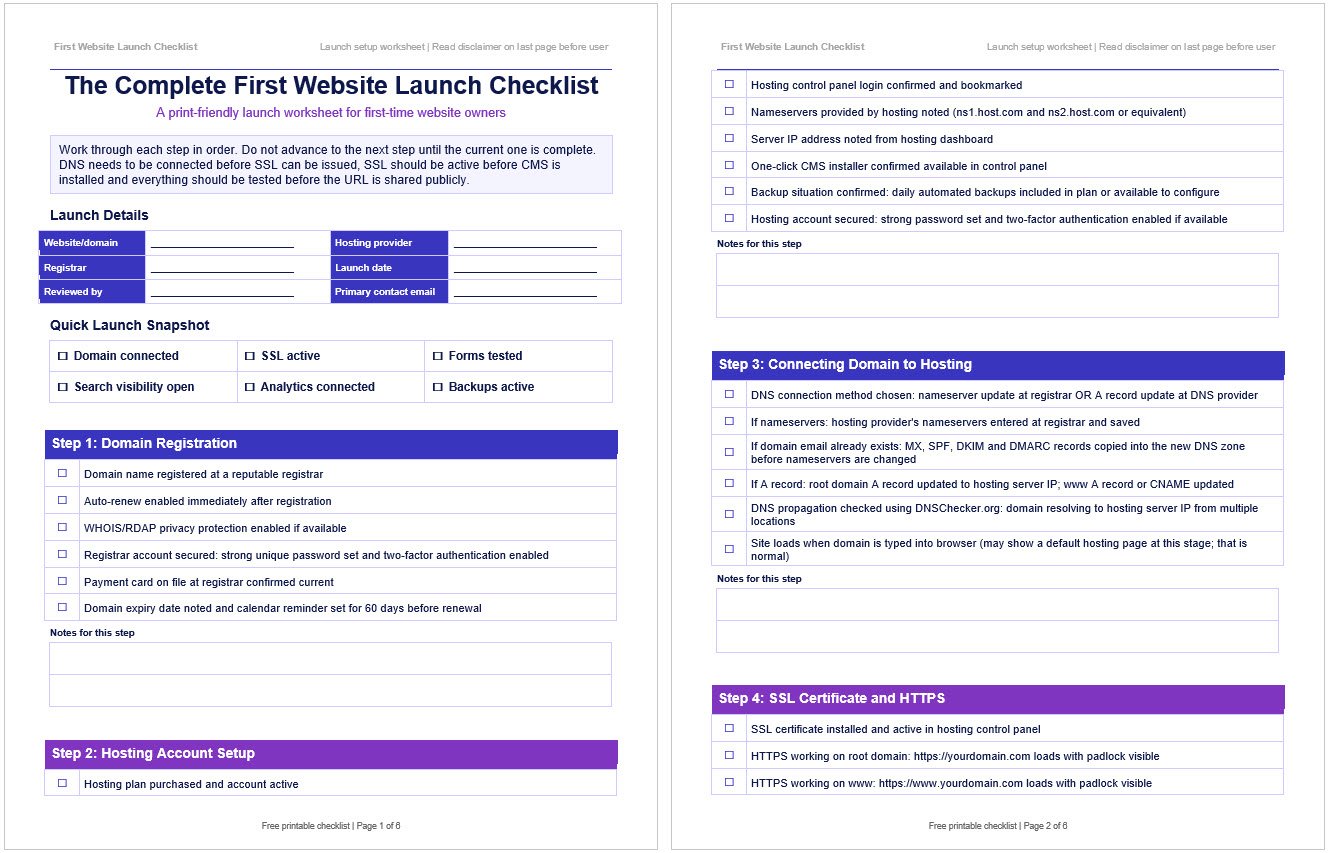
The complete checklist below is available as a free download in PDF and editable Word format. Work through it step by step as you set up your site, print it and tick boxes by hand, or share it with whoever is building the site for you.
Both versions include all checklist items across the seven steps, with space for notes at each stage. The Word version is fully editable so you can adapt it for your specific platform and hosting setup.
Key Takeaways
- Domain registration, hosting setup and DNS connection are three separate steps that all need to be completed before your site is accessible to visitors
- SSL certificates should be active and HTTPS working before you share your site URL with anyone; a browser security warning on a new site creates an immediate trust problem that is hard to recover from
- Automated daily backups should be configured before launch and before ongoing content work begins; retroactive backup setup protects nothing that happened before it was enabled
- Removing search engine blocking is one of the most commonly missed launch steps; many CMS platforms block crawling by default during development and that setting is easy to forget to reverse
- Google Search Console and an analytics tool should be connected on launch day; the data they collect from the first visit has no retroactive equivalent and every day without them is data permanently lost
- A contact form that does not submit is often the first thing a potential client encounters; test every form before sharing the URL
- Free uptime monitoring tools can alert you quickly if your site goes offline after launch
A first website launch has a predictable set of problems. The contact form was never tested and submits to no one.
The SSL certificate was not installed and visitors see a browser warning before they see a single word of content.
Search engines were blocked during development and no one remembered to unblock them.
Analytics was going to be set up “after launch” which means there is no baseline data from the early days when understanding visitor behavior matters most.
None of these are complicated problems. They are all the result of not having a checklist.
This checklist covers the infrastructure and technical foundation of a first website launch, from the moment you register a domain to the moment your site is live, indexed, backed up and monitored.
It is not a content checklist or a design checklist. It does not cover SEO strategy, social media or paid advertising. It covers the technical setup that everything else depends on.
If you are still deciding on hosting before working through this checklist, why every website needs a hosting account explains what hosting actually does, and the best hosting service for beginners covers what to look for when choosing a first plan.
Our pre-purchase hosting verification checklist is also worth running through before committing to a provider.
Once you have a domain and hosting in place, this checklist picks up from there.

Step 1 - Domain Registration
Your domain name is your website’s permanent address. It is the first thing to set up, before hosting, before building, before anything.
Getting the registration right from the start saves a lot of administrative frustration later.
Choose a registrar you can access easily and that has a clear, usable control panel.
Register your preferred domain name and, where relevant, consider registering the primary country-code TLD alongside the .com.
If your business is primarily local and country-specific, the country TLD may matter more to your audience than the .com.
Enable auto-renew immediately
A domain registration that lapses takes your entire site offline. Email stops working. Visitors see a parked page or an error. Auto-renew prevents this.
Enable it before you do anything else and confirm the payment method on file is current. Set a calendar reminder for 60 days before the renewal date as a secondary check.
Enable WHOIS/RDAP privacy protection if available
Depending on the registrar, TLD and registrant type, some domain registration details may be publicly visible through WHOIS or RDAP lookup tools.
Privacy protection or proxy services can help keep personal contact details from appearing publicly where available. Enable it immediately if your registrar offers it. It reduces spam, prevents data harvesting and helps keep personal details out of public records.
Secure the registrar account
Enable two-factor authentication on the registrar account and use a strong, unique password stored in a password manager. The registrar account controls your domain name.
If it is compromised, your domain can be transferred away from you. This is not a theoretical risk; domain hijacking happens and the recovery process is painful.
For more on what a domain registrar does and how domain registration relates to hosting, how domain registrars work and the difference between domain hosting and web hosting cover both clearly.

Step 2 - Hosting Account Setup
Once you have a domain, you need hosting. Hosting is the service that stores your website files and makes them available to visitors.
Without it, your domain is just a name that points nowhere.
After purchasing a hosting plan, log in to the hosting control panel and confirm you can access it without issues.
Many beginner-friendly hosts use cPanel, while others use custom dashboards, hPanel, Plesk or similar control panels.
Note the following details from the hosting dashboard, as you will need them in the next step: the nameserver addresses provided by the host (usually listed as ns1.hostname.com and ns2.hostname.com) and the server IP address.
Confirm that a one-click CMS installer is available if you are building with WordPress, Joomla or another CMS.
On many shared hosting plans this is Softaculous or a similar one-click installer accessible from the hosting control panel.
If you cannot find it, contact the host’s support before proceeding.
Also confirm at this stage that daily automated backups are included in your plan or available as a setting you can enable.
Understanding the backup situation before you add content is important.
Some hosts include automated backups by default; others require you to configure them manually or purchase them as an add-on.
Know which situation applies to your plan now, before you need the backup.
If you have not yet chosen a hosting provider and want a structured framework for evaluating options before committing, our hosting provider verification checklist covers everything worth confirming before signing up.

Step 3 - Connecting Your Domain to Hosting
Registering a domain and purchasing hosting are two separate transactions that do not connect automatically.
You need to explicitly point your domain at your hosting server so that when someone types your domain into a browser, it loads your site rather than a default hosting page or an error.
The most common method for a first website is updating the nameservers at your domain registrar to the nameservers provided by your hosting provider.
Log in to your registrar’s domain management panel, find the nameserver settings for your domain and replace the default nameservers with the ones your host gave you.
Save the change. DNS changes take time to propagate.
Many record updates begin appearing within minutes to a few hours, but nameserver changes and cached records can take longer, sometimes up to 24 to 48 hours depending on TTLs, resolver caching and registry behavior.
If your domain already has email configured, do not change nameservers until you have copied the existing MX, SPF, DKIM and DMARC records into the new DNS zone.
Otherwise, email can stop working even if the website loads.
An alternative approach is to keep your nameservers at the registrar and update only the A record to point to your hosting server’s IP address.
This is a cleaner option if you want to manage DNS at your registrar rather than moving it to the host.
Both approaches work; the full explanation of when to use each is covered in connecting your domain to hosting and how to point a domain to a web host.
To verify the connection is taking effect, use DNSChecker.org to check what your domain resolves to from multiple locations around the world.
When you see your hosting server’s IP appearing consistently across regions, the DNS change has propagated.
If you want to understand what is happening under the hood during this process, how the Domain Name System works and what nameservers do and how to change them cover both clearly.
Running the DNS record verification checklist after your domain is connected confirms all records are configured correctly before you build anything on top of them.

Step 4 - SSL Certificate and HTTPS
An SSL certificate is what puts the padlock in the browser bar and enables HTTPS. It encrypts the connection between the visitor’s browser and your server.
Without HTTPS, browsers such as Chrome may label the connection as “Not secure” or show a warning icon in the address bar, especially on pages with forms, logins or payment fields.
For a new site trying to make a good first impression, that warning is a significant obstacle.
Most reputable hosting providers include free SSL certificates via Let’s Encrypt and install them automatically once your domain’s DNS is correctly pointed at the hosting server.
Let’s Encrypt’s documentation explains how their free automated certificate authority works.
In most cases on beginner-friendly shared hosting, you log in to the control panel after DNS propagation is complete and find the SSL certificate has already been issued.
Confirm three things before moving on. First, that HTTPS is working on both the root domain (yourdomain.com) and www (www.yourdomain.com).
Second, that HTTP requests are being redirected to HTTPS, meaning that typing http://yourdomain.com in a browser automatically redirects to https://yourdomain.com.
Third, that there are no mixed content warnings: open your browser’s developer tools, go to the Console tab and look for any warnings about HTTP assets loading on an HTTPS page.
These usually appear when images or scripts in a theme or plugin are referenced via http:// URLs rather than https://.
In WordPress, confirm the WordPress Address and Site Address use https:// under Settings > General, or use your host’s HTTPS enforcement tool if available.
If SSL is not automatically installed, look for an SSL section in your hosting control panel and install a Let’s Encrypt certificate from there.
If you cannot find it, contact your host’s support team.
Ideally, confirm SSL before installing or configuring the CMS. If your host requires CMS or domain setup first, confirm SSL before publishing content, sharing the URL or submitting the site to search engines.
Step 5 - CMS Installation and Site Setup
With domain connected, hosting active and SSL confirmed, you are ready to install your CMS. On most shared hosting plans, this is a one-click process.
In cPanel, find the Softaculous or similar installer, select WordPress, choose your domain and complete the installation form.
Note the admin username and password you set and store them securely in a password manager.
After logging in to the WordPress dashboard, work through the basic configuration before building any pages.
Set the site title and tagline under Settings > General.
Set the correct timezone under Settings > General (this affects post scheduling, comment timestamps and any date-sensitive functionality).
Set your preferred permalink structure under Settings > Permalinks.
Post name (yourdomain.com/post-name/) is the most common choice for new sites and the most SEO-friendly.
Install and activate your chosen theme.
Delete unused demo themes, but consider keeping one current default WordPress theme as a fallback.
Delete any placeholder pages, posts or demo content that came with the theme.
Before launch, confirm WordPress core, the active theme and all plugins are updated.
Secure the WordPress admin account before publishing anything important.
Use a strong, unique password, avoid or replace the default “admin” username and enable two-factor authentication for WordPress admin access if your host, security plugin or identity provider supports it.
Create your core pages: at minimum a Homepage, an About page, a Contact page and a Privacy Policy page.
If you collect personal data through contact forms, analytics, comments, accounts or ecommerce, you will usually need a privacy policy that explains what you collect and how it is used.
Requirements vary by jurisdiction, so use qualified legal guidance or a reputable privacy policy tool if needed.
The most commonly missed step at launch: confirm search engine visibility
WordPress includes a setting under Settings > Reading called “Discourage search engines from indexing this site.”
This checkbox is frequently enabled during development to prevent an unfinished site from being indexed.
It is equally frequently forgotten when the site goes live.
When this box is checked, WordPress discourages search engines from crawling and indexing the site.
Reputable search engines generally honor these instructions, which can prevent pages from appearing properly in search results until the setting is unchecked and Google recrawls the site.
Go to Settings > Reading right now and confirm the box is unchecked.
This takes five seconds and is the single most impactful check on the entire list for long-term site visibility.
I have seen this setting trip up a surprising number of first-time site owners.
A site that looks completely live and functional can go weeks without being indexed because no one unchecked that box.
Confirm it before publishing a single page.
Test that the site is accessible by loading it in a browser.
Navigate to a page you have published and confirm it loads correctly.
Test it on a mobile device as well.
A site that looks fine on desktop may have display issues on mobile that are worth catching now rather than after launch.

Step 6 - Contact Form and Core Functionality Testing
Before sharing your site URL with anyone, test every interactive element.
This sounds obvious and is consistently underdone on first websites.
Contact form
Install a contact form plugin (Contact Form 7 and WPForms are both widely used on WordPress). Configure the form to send submissions to your business email address.
Submit a test message from a different email account and confirm it arrives at the destination inbox.
Check the spam folder if it does not appear in the main inbox; form submission emails are sometimes filtered.
If the submission does not arrive, investigate the mail sending configuration before going live.
A contact form that looks functional but sends nothing is worse than no contact form because it gives the visitor false confidence that they reached you.
If form emails do not arrive reliably, configure SMTP through your email provider or a transactional email service rather than relying on default PHP mail.
Navigation and links
Click every item in your main navigation menu and confirm it loads the correct page. Click any buttons or calls to action across the site.
Check that your logo links back to the homepage. Look for any broken links or pages returning 404 errors.
Mobile display
Open your site on a mobile phone and navigate through it as a visitor would.
Check that the navigation works, images display correctly, text is readable without zooming and buttons are large enough to tap easily.
Mobile traffic typically accounts for more than half of web traffic; a site that only works on desktop is a site that half your visitors will struggle with from day one.
404 page
Type a URL that does not exist on your site (for example, yourdomain.com/this-page-does-not-exist) and confirm a useful 404 page appears rather than a blank server error.
WordPress includes a default 404 template; confirm it is active and functional.
If your site has ecommerce functionality, test the full purchase flow: add a product to the cart, proceed through checkout, complete a test payment using sandbox/test mode where available and confirm the order confirmation email is received.
Payment and checkout failures discovered after launch are among the most damaging errors for a new business site.

Step 7 - Analytics, Search Console, Backups and Monitoring
The four setups in this section are consistently deferred to “after launch” and consistently regretted when deferred.
None of them take long. All of them collect data or provide protection from the moment they are active.
Setting them up on launch day rather than a week after costs fifteen minutes and eliminates a permanent gap in your data and protection history.
If you use analytics, contact forms, cookies, ecommerce or remarketing tools, make sure your privacy policy and consent setup match the laws that apply to your location and audience.
Google Analytics (GA4)
Create a Google Analytics 4 property at analytics.google.com, generate your measurement ID and install it on your site.
On WordPress, a plugin like Site Kit by Google or MonsterInsights handles this without requiring code changes.
Once active, open the GA4 Realtime report, visit your site from another device and confirm a session appears in the dashboard.
Data collection may take a little time to begin, so allow up to 30 minutes before assuming tracking is broken.
This confirms the tracking is working.
Every visit from this point forward is data you can use; every visit before setup is data that does not exist.
Google Search Console
Create a Search Console property at search.google.com/search-console for your domain.
Verify domain ownership using the DNS TXT record method (paste the verification record into your DNS provider) or the HTML tag method (add a meta tag to your site’s header).
Once verified, generate an XML sitemap (Yoast SEO and Rank Math both create sitemaps automatically on WordPress) and submit it in Search Console under Sitemaps.
This helps Google discover the URLs you want crawled, but it does not guarantee that every page will be indexed.
Also consider submitting your site to Bing Webmaster Tools at the same time; the process is similar and the audience overlap is worth having.
Automated daily backups
Confirm your backup setup is active and that the first backup has run.
If your hosting plan includes automated backups, verify in the hosting dashboard that they are enabled and scheduled.
If your plan does not include daily automated backups or you want an additional off-server backup, install a backup plugin like UpdraftPlus on WordPress and configure it to back up daily to a cloud storage destination (Google Drive, Dropbox or Amazon S3).
Run a manual backup immediately after launch so you have a clean baseline restore point from the moment the site was live.
Our monthly hosting maintenance routine covers how to verify your backups are working correctly each month going forward.
Uptime monitoring
Set up a free uptime monitoring tool such as UptimeRobot.
Add your domain as a monitored URL with a 5-minute check interval and configure email alerts to your primary address.
If your site goes offline for any reason after launch, you will know quickly rather than finding out when a client mentions they could not reach your site.
This takes about five minutes to set up and costs nothing on the free tier.

The Complete First Website Launch Checklist
Work through each step in order. Do not advance to the next step until the current one is complete.
The order matters: DNS needs to be connected before SSL can be issued, SSL should be active before CMS is installed, and everything should be tested before the URL is shared publicly.
This checklist is available as a free downloadable PDF and editable Word document above at Web Hosting Services.
Step 1 | Domain Registration
- ☐ Domain name registered at a reputable registrar
- ☐ Auto-renew enabled immediately after registration
- ☐ WHOIS/RDAP privacy protection enabled if available
- ☐ Registrar account secured: strong unique password set and two-factor authentication enabled
- ☐ Payment card on file at registrar confirmed current
- ☐ Domain expiry date noted and calendar reminder set for 60 days before renewal
Step 2 | Hosting Account Setup
- ☐ Hosting plan purchased and account active
- ☐ Hosting control panel login confirmed and bookmarked
- ☐ Nameservers provided by hosting noted (ns1.host.com and ns2.host.com or equivalent)
- ☐ Server IP address noted from hosting dashboard
- ☐ One-click CMS installer confirmed available in control panel
- ☐ Backup situation confirmed: daily automated backups included in plan or available to configure
- ☐ Hosting account secured: strong password set and two-factor authentication enabled if available
Step 3 | Connecting Domain to Hosting
- ☐ DNS connection method chosen: nameserver update at registrar OR A record update at DNS provider
- ☐ If nameservers: hosting provider’s nameservers entered at registrar and saved
- ☐ If domain email already exists: MX, SPF, DKIM and DMARC records copied into the new DNS zone before nameservers are changed
- ☐ If A record: root domain A record updated to hosting server IP; www A record or CNAME updated
- ☐ DNS propagation checked using DNSChecker.org: domain resolving to hosting server IP from multiple locations
- ☐ Site loads when domain is typed into browser (may show a default hosting page at this stage; that is normal)
Step 4 | SSL Certificate and HTTPS
- ☐ SSL certificate installed and active in hosting control panel
- ☐ HTTPS working on root domain: https://yourdomain.com loads with padlock visible
- ☐ HTTPS working on www: https://www.yourdomain.com loads with padlock visible
- ☐ HTTP to HTTPS redirect active: typing http://yourdomain.com redirects to HTTPS automatically
- ☐ WordPress Address and Site Address confirmed using https:// under Settings > General, or host HTTPS enforcement enabled
- ☐ No mixed content warnings in browser developer console
Step 5 | CMS Installation and Site Setup
- ☐ WordPress or CMS installed via one-click installer
- ☐ WordPress admin login credentials saved securely in password manager
- ☐ WordPress admin account secured with a strong unique password
- ☐ Default “admin” username avoided or replaced
- ☐ Two-factor authentication enabled for WordPress admin if supported
- ☐ Site title and tagline set under Settings > General
- ☐ Correct timezone set under Settings > General
- ☐ Permalink structure set under Settings > Permalinks (post name recommended)
- ☐ Theme installed and activated; unused demo themes deleted and one current default WordPress theme kept as a fallback if desired
- ☐ WordPress core, active theme and plugins updated before launch
- ☐ Placeholder and demo content removed
- ☐ Core pages created: Home, About, Contact, Privacy Policy
- ☐ Search engine visibility confirmed: Settings > Reading > “Discourage search engines from indexing this site” is UNCHECKED
- ☐ Site loads correctly in browser on desktop and mobile
- ☐ robots.txt confirmed: not blocking crawlers
Step 6 | Contact Form and Functionality Testing
- ☐ Contact form installed and configured to send submissions to business email address
- ☐ Test submission sent from a different email account and confirmed received at destination inbox
- ☐ If form emails do not arrive reliably, SMTP or a transactional email service configured
- ☐ Form tested on mobile: submits correctly on a phone
- ☐ All navigation menu items tested: each links to the correct page
- ☐ All buttons and calls to action tested: each works as expected
- ☐ Logo confirmed linking to homepage
- ☐ Site tested on mobile device: layout correct, text readable, buttons tappable
- ☐ 404 error page confirmed: a non-existent URL shows a useful page not a server error
- ☐ If ecommerce: full purchase flow tested including checkout, sandbox/test-mode payment where available and confirmation email
Step 7 | Analytics, Search Console, Backups and Monitoring
- ☐ Privacy policy and consent setup reviewed for analytics, contact forms, cookies, ecommerce or remarketing tools based on applicable laws
- ☐ Google Analytics 4 property created and tracking code installed on site
- ☐ GA4 tracking confirmed: Realtime report shows a live session when site is visited (allow up to 30 minutes for data collection to begin)
- ☐ Google Search Console property created and domain ownership verified
- ☐ XML sitemap generated and submitted in Google Search Console under Sitemaps
- ☐ Bing Webmaster Tools property created and sitemap submitted
- ☐ Automated daily backups confirmed active: first backup has run and file size is reasonable
- ☐ Backup storage location confirmed: backup is stored off-server or at a cloud storage destination
- ☐ Uptime monitoring configured: domain added to UptimeRobot or equivalent with email alerts active
- ☐ Test alert confirmed: monitoring tool is actively checking the site
Ready to Launch or Need Help Getting Set Up?
Working through this checklist before sharing your URL means your site is secure, connected, testable and protected from day one.
The items that most commonly get skipped are the ones that cause the most visible problems: an SSL warning that greets every visitor, a contact form that submits to no one and a site that search engines cannot find because the search engine visibility setting was never updated.
At Web Hosting Services, we help first-time site owners get the technical foundation right from the start, from choosing the right hosting plan and connecting the domain to confirming SSL, testing forms and setting up analytics and backups.
If you want someone to handle the setup or check that everything is configured correctly before you go live, contact us and describe what you are building.
We will make sure the infrastructure is solid before your first visitor arrives.
References & Additional Resources
- Google. “Get Started with Search Console.” Google Search Central Help.
- Google. “Set Up Analytics for a Website.” Google Analytics Help.
- Google. “Block Search Indexing with Noindex.” Google Search Central Documentation.
- Google. “Check if a Site’s Connection Is Secure.” Google Chrome Help.
- Let’s Encrypt. “Documentation.”
- WordPress.org. “Requirements.”
- ICANN. “Privacy and Proxy Services.”
- Federal Trade Commission. “Protecting Personal Information: A Guide for Business.”
- DNSChecker.org. “DNS Propagation Check.”
- Bing. “Bing Webmaster Tools.”
- StatCounter. “Desktop vs Mobile vs Tablet Market Share Worldwide.”
- UptimeRobot. “Website Monitoring.”
Tagged In:
- Backups, Beginner Hosting, DNS Settings, Domain Connection, Domain Names, Domain Registration, First Website, Hosting Fundamentals, Hosting Reliability, Hosting Setup, New Website Owners, SSL Certificates, Web Hosting, Web Hosting Basics, Website Beginners, Website Hosting, Website Launch, Website Performance, Website Setup, WordPress